Turorial - Understanding Kubernetes services and ingresses

1. Objective
The goal is to understand and manipulate services and ingresses
This tutorial directly uses a subset of the examples of the book “Kubernetes in action” written by Marko Lukša. All examples of the book can be found here.
2. A first internal service
create a file 6-kubia-svc.yaml with the following content:
apiVersion: v1
kind: Service
metadata:
  name: kubia
spec:
  ports:
  - port: 80
    targetPort: 8080
  selector:
    app: kubia
> kubectl create -f 6-kubia-svc.yaml
> kubectl get svc
NAME         TYPE        CLUSTER-IP      EXTERNAL-IP   PORT(S)   AGE
kubernetes   ClusterIP   10.100.0.1      <none>        443/TCP   5d23h
kubia        ClusterIP   10.100.10.113   <none>        80/TCP    73s
The service is accessible from inside the cluster with the IP address 10.100.10.113 on port 80. The service is not accessible from outside the cluster.
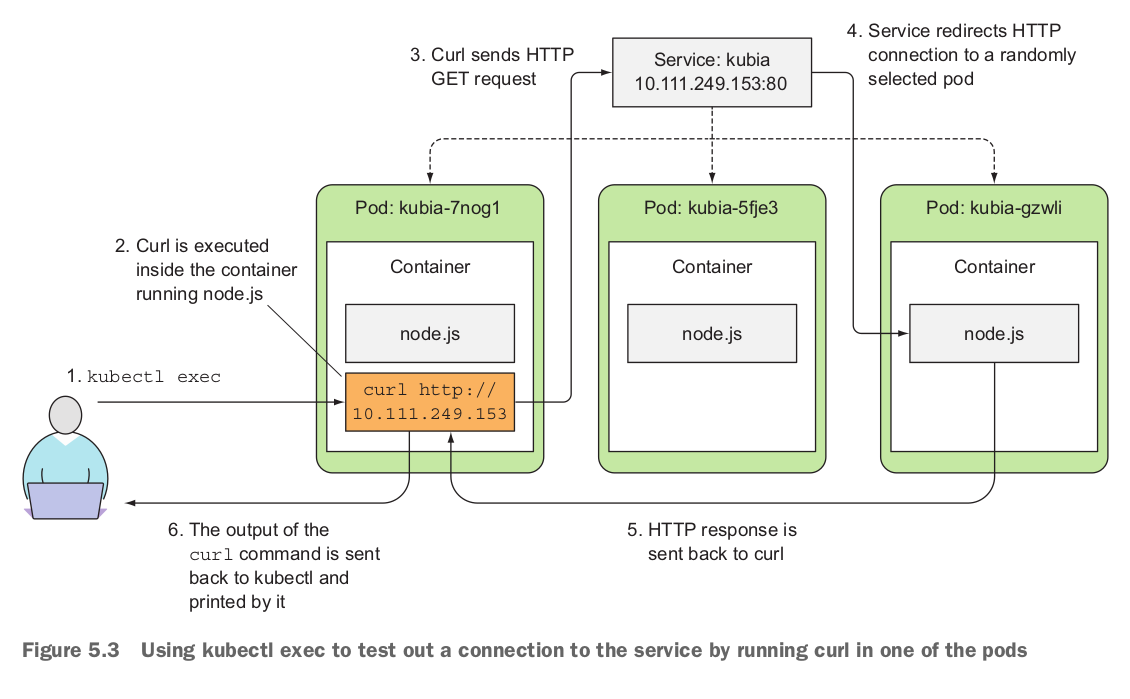
To check if the service works well we will send HTTP requests to it through one of our pods.
|
Note
|
If you have destroyed your pods you can create them again with the file kubia-replicaset.yaml
|
> kubectl get pods
NAME          READY   STATUS              RESTARTS   AGE
kubia-9c2z2   0/1     ContainerCreating   0          3s
kubia-fdd7z   0/1     ContainerCreating   0          3s
kubia-jqxrs   0/1     ContainerCreating   0          4s
The following command execute the command curl -s … within the container of the pod kubia-9c2z2
> kubectl exec kubia-9c2z2 — curl -s http://10.100.10.113
|
Note
|
Everything after the double dash is the command that should be executed inside the pod |
By executing this command multiple times you should see that the service load balance the request to the different Kubia pods.
You've hit kubia-jqxrs|
Important
|
Kubernetes is equipped with a DNS server (remember the kube-system namespace and associated pods). Hence, you can directly use the name of the service instead of its IP address > kubectl exec kubia-9c2z2 — curl -s http://kubia
|
3. An external load balancer service
Create a file 7-kubia-svc-loadbalancer.yaml with the following content:
apiVersion: v1
kind: Service
metadata:
  name: kubia-loadbalancer
spec:
  type: LoadBalancer
  ports:
  - port: 80
    targetPort: 8080
  selector:
    app: kubia
> kubectl create -f 7-kubia-svc-loadbalancer.yaml
> kubectl get svc
NAME                 TYPE           CLUSTER-IP     EXTERNAL-IP     PORT(S)        AGE
kubia-loadbalancer   LoadBalancer   10.100.10.42   35.223.11.253   80:30856/TCP   45s
For this service we have an external IP address that you can directly request!
> curl http://35.223.11.253
You’ve hit kubia-9c2z2
4. Exposing a service through an Ingress resource
Create a file 8-kubia-ingress.yaml with the following content:
apiVersion: networking.k8s.io/v1
kind: Ingress
metadata:
  name: kubia-ingress
spec:
  rules:
  - http:
      paths:
      - path: /test
        pathType: Prefix
        backend:
          service:
            name: kubia-loadbalancer
            port:
              number: 80
> kubectl create -f 8-kubia-ingress.yaml
> kubectl get ingresses
NAME             CLASS    HOSTS   ADDRESS          PORTS   AGE
kubia-ingress    <none>   *       35.244.142.170   80      4m25s
You may have to wait a bit before the IP address is available.
`> curl http://35.244.142.170/test
Note that you can also define more than one path for the same hosting address, and that you can also declare more than one rule (host).
rules:
  - http:
      paths:
      - path: /test
        pathType: Prefix
        backend:
          service:
            name: kubia-loadbalancer
            port:
              number: 80
      - path: /foo
...rules:
- http:
paths:
- path: /test
pathType: Prefix
backend:
service:
name: kubia-loadbalancer
port:
number: 80
- http:
paths:
- ...Do not forget to clean your services and ingresses!