Turorial - Using OpenStack Terraform

1. Objective
In this tutorial, we will be deploying a publicly-accessible Wordpress server. We will do so with two VMs containing the Wordpress frontend and backend. For the public part, we have to create a few network resources.
The Brest’s OpenStack platform we will use is accessible at https://openstack.imt-atlantique.fr/. You should be connected to the school’s WiFi.
The reference of the OpenStack provider is accessible at https://registry.terraform.io/providers/terraform-provider-openstack/openstack/latest/docs.
2. Preamble
The latter above link points to the page describing the provider configuration (provider block), not the resources themselves.
Provider configuration is usually used for credential informations.
Since OpenStack have many different services and the provider exposes many resources for each service, you may find your way in the provider reference with the Filter text area.
At first, we will configure credentials to access Brest’s OpenStack API, and create a keypair for our VM instances.
2.1. OpenStack provider credentials
As in the previous tutorial, we must have a terraform block that requires our provider, here terraform-provider-openstack/openstack.
Unlike the previous tutorial, we will split our configuration into multiple files. Remember, all .tf files of the working directory in which we invoke the Terraform CLI constitutes the root module.
They will be merged as a single configuration, thus we can references resources across files seamlessly. The split serves as logical decomposition of resources.
Copy the following in a new file called providers.tf.
terraform {
  required_version = ">= 1.6.0"
  required_providers {
    openstack = {
      source  = "terraform-provider-openstack/openstack"
      version = "1.53.0"
    }
  }
}
In addition to the required_providers block, we have a required_version attribute that constrain the Terraform version we can use on this module.
Furthermore, we will configure our OpenStack provider with login credentials. Copy the following in providers.tf.
# Configure the OpenStack Provider
provider "openstack" {
  user_name   = "TODO"
  tenant_name = "login-nuage-TODO"
  auth_url    = "https://openstack.imt-atlantique.fr:13000"
  region      = "Brest1"
}
Of course, change the TODO placeholders with your values.
|
Note
|
You must set the OS_PASSWORD environment variable before calling terraform.
In Unix environment, it is done by export OS_PASSWORD='TODO'
|
Run terraform init to download the provider.
2.2. VM Key pair
As you know, an OpenStack VM instance have an attached key pair that you can use in order to login onto the VM.
There is a resource called openstack_compute_keypair_v2 that can generate a key pair for you.
Create a new file called vm.tf and copy the following.
resource "openstack_compute_keypair_v2" "os_kp" {
  name = "os-admin"
}
Run terraform apply.
It will make a first request to the OpenStack API, thus approve or reject your credentials.
If all went well and the key pair is created, run
terraform state list
and then
terraform state show openstack_compute_keypair_v2.os_kp
|
Note
|
Make yourself a favour and abuse copy-pasting for all kinds of name identifiers in order to avoid typo errors. |
You should see something like this
# openstack_compute_keypair_v2.os_kp:
resource "openstack_compute_keypair_v2" "os_kp" {
    fingerprint = "56:74:8d:4c:87:8d:18:00:e8:bf:f6:a7:b1:93:50:2c"
    id          = "os-admin"
    name        = "os-admin"
    private_key = (sensitive value)
    public_key  = "ssh-rsa AAAAB3NzaC1yc2EAAAADAQABAAABAQCqq+oY ..."
    region      = "Brest1"
}
The private key is masked as (sensitive value) but still present in the state file. This is not good !
Moreover, you have to extract this key pair in a .pem file in order to use it with SSH as an identity.
Let’s destroy it.
terraform destroy
We will rather create the key pair manually on the dashboard and use a data block.
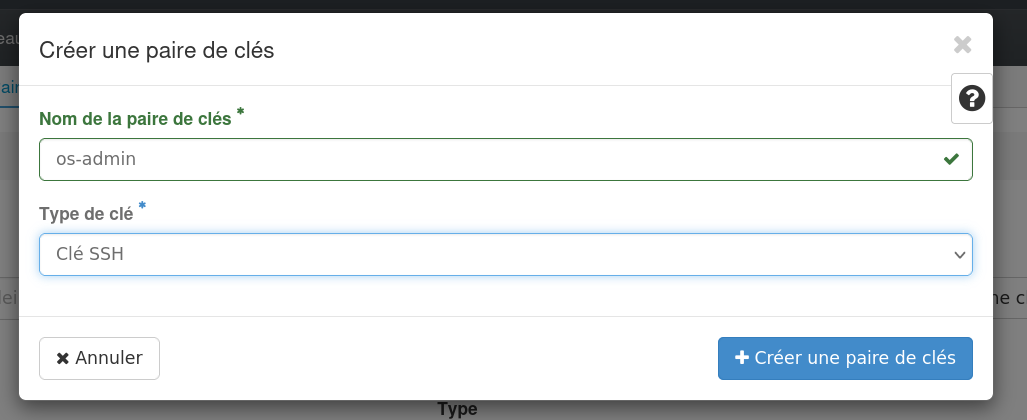
On the Compute tab, go to Paires de clés and + Créer une paire de clés. Call it os-admin as previously and set its type Type de clé to Clé SSH.
Upon creation, it should automatically download the os-admin.pem key file. Store it a safe place with permissions 600.
Now return in vm.tf and change the keypair resource to a data source. For this, just replace resource by data.
Plan and Apply.
Then list resources with terraform state list. The reference to the key pair resource now appears with a prefixed data, meaning it is a data source (i.e. read-only).
We can still show the state of the key pair, but now the private_key attribute is now absent.
3. VM and Network provisioning
Before deploying our Wordpress application, we need to do a little bit of networking.
3.1. Internal network
OpenStack have a predefined network called external that is pubicly accessible. Since it is critical, it is managed by the Brest team for all users, so it is not ours to modify.
We will create our own internal network on which our VMs will be deployed, than we will have a floating IP in the external network that will redirect to our VMs.
We will configure our own internal network with Terraform. For this, we need multiple resources
-
A network that we call
internal, -
A subnetwork with custom CIDR range and DNS that uses IMT’s nameservers,
-
A router in the
externalnetwork with an additional interface in theinternalnetwork, -
A security group and associated rules to allow incoming traffic.
|
Note
|
You will see that all above resources have their type prefixed with openstack_networking_. It basically corresponds to the Neutron OpenStack service. Logically openstack_compute_* refers to Nova resources, openstack_images* to Glance, etc.
|
Create a new file internal_net.tf and copy the following, setting network resources.
# internal_net.tf

resource "openstack_networking_network_v2" "internal" {
  name           = "internal"
  admin_state_up = "true"
}

resource "openstack_networking_subnet_v2" "subnet" {
  name            = "subnet"
  network_id      = openstack_networking_network_v2.internal.id
  cidr            = "192.168.42.0/24"
  ip_version      = 4
  dns_nameservers = ["192.44.75.10", "192.108.115.2"]
}

resource "openstack_networking_secgroup_v2" "sg-open" {
  name        = "sg-open"
  description = "Open security group, allows everything"
}
resource "openstack_networking_secgroup_rule_v2" "secgroup_rule_all" {
  direction         = "ingress"
  ethertype         = "IPv4"
  remote_ip_prefix  = "0.0.0.0/0"
  security_group_id = openstack_networking_secgroup_v2.sg-open.id
}

# External network/router
resource "openstack_networking_router_v2" "router" {
  name                = "router"
  admin_state_up      = true
  external_network_id = "8c49bf69-e2ea-48a2-ada1-753a031f402d" # external
}
resource "openstack_networking_router_interface_v2" "router_interface" {
  router_id = openstack_networking_router_v2.router.id
  subnet_id = openstack_networking_subnet_v2.subnet.id
}

# Allow SSH ingress to default security group
data "openstack_networking_secgroup_v2" "default" {
  name        = "default"
}
resource "openstack_networking_secgroup_rule_v2" "sg_rule_ssh" {
  direction         = "ingress"
  ethertype         = "IPv4"
  protocol          = "tcp"
  port_range_min    = 22
  port_range_max    = 22
  remote_ip_prefix  = "0.0.0.0/0"
  security_group_id = data.openstack_networking_secgroup_v2.default.id
}
Plan and Apply.
3.2. Floating IP for a simple VM
Since our VM will be on the internal network, it is not directly accessible.
We need a floating IP on the external network and attach it to the VM.
On the background, OpenStack will effectively create a NAT redirection from the external floating IP to the internal one.
Another advantage of a floating IP is that once it is created, it does not change.
On the contrary, a VM access IP may change each time it is destroyed and created again.
Attaching a floating IP allows us to have a fixed endpoint.
In the file vm.tf, add the following content.
# Image to boot the VM. Predefined by Brest's team.
data "openstack_images_image_v2" "imta" {
  name        = "imta-ubuntu22"
  most_recent = true
}

resource "openstack_compute_instance_v2" "wp_app" {
  name            = "wordpress-app"
  image_name      = data.openstack_images_image_v2.imta.name
  flavor_name     = "m1.small"
  key_pair        = data.openstack_compute_keypair_v2.os_kp.name
  security_groups = [ "sg-open" ]
  network {
    name = "internal"
  }
}

# Floating IP
resource "openstack_networking_floatingip_v2" "wp_ip" {
  pool = "external"
}
resource "openstack_compute_floatingip_associate_v2" "wp_ip_assoc" {
  floating_ip = openstack_networking_floatingip_v2.wp_ip.address
  instance_id = openstack_compute_instance_v2.wp_app.id
}

# Outputs
output "wp_floating_ip" {
  value       = openstack_networking_floatingip_v2.wp_ip.address
  description = "Floating IP associated to the VM"
}
Here, you can see that we have declared a data source for an image and refer to it in the VM instance resource.
This is a predefined image managed by Brest’s team.
Available images can be seen on the dashboard : Compute → Images.
Note this image and the previous key pair are data sources and not a proper resource s,
to reference such data sources, we need to use the special variable data as prefix.
Plan and Apply.
The output value is displayed after apply. You can display it again with
terraform output
If all went well, try to connect onto your VM with
ssh -i TODO_PATH/os-admin.pem ubuntu@TODO_IP
If you see something like the following,
@@@@@@@@@@@@@@@@@@@@@@@@@@@@@@@@@@@@@@@@@@@@@@@@@@@@@@@@@@@
@         WARNING: UNPROTECTED PRIVATE KEY FILE!          @
@@@@@@@@@@@@@@@@@@@@@@@@@@@@@@@@@@@@@@@@@@@@@@@@@@@@@@@@@@@
Permissions 0644 for 'os-admin.pem' are too open.
It is required that your private key files are NOT accessible by others.
This private key will be ignored.
Load key "os-admin.pem": bad permissions
ubuntu@10.129.179.121: Permission denied (publickey).
It means that your private key have too indulgent permissions.
Here it’s 644 but it should be 600 so that only us can read the file.
To fix this in Unix systems,
chmod 600 TODO_PATH/os-admin.pem
Try to SSH again, if succeeded you should have a prompt like the following.
ubuntu@wordpress-app:~$
The VM is now up and accessible, but it is "empty": no Wordpress and no databases are running.
4. Wordpress deployments
We now want to deploy a running Wordpress together with its associated MariaDB. The database will run on a separate VM. For this, we need to configure or contextualize the machines. As you know from your previous course on OpenStack, we can achieve this with the cloud-init technology.
The installation scripts are passed through a user_data attribute of the VM resource.
When applying such a resource, Terraform will spin up the VM as usual and return "Success" upon its creation.
It is only then that the OpenStack provider runs cloud-init.
We will adopt a modified version of the scripts install-wordpress.sh and install-mariadb.sh.
Download both script and place them next to your .tf files.
|
Note
|
In the shell scripts, the syntax ${ } is similar to Terraform’s string interpolation.
In fact, the scripts will be seen as templates and the values of variables will be passed in the .tf with the templatefile() function.
|
Modify your previous openstack_compute_instance_v2.wp_app resource to add user_data with our script.
user_data = templatefile("${path.module}/install-wordpress.sh", {
  db_name     = "wordpress"
  db_user     = "lab-tf"
  db_password = "lab-tf"
  db_host     = openstack_compute_instance_v2.wp_db.access_ip_v4
})
|
Note
|
The templatefile() takes as first argument the path of our script, then an object of key-value pairs to instantiate the variables inside ${} markers in the template.
Note here another special variable path. Here in our case, path.module will simply resolve to ., the current working directory.
More information at
https://developer.hashicorp.com/terraform/language/expressions/references#filesystem-and-workspace-info
|
In the above, the db_host attribute references a wp_db instance resource.
Here is the code of the VM holding the DB, add it to vm.tf.
resource "openstack_compute_instance_v2" "wp_db" {
  name            = "wordpress-db"
  image_name      = data.openstack_images_image_v2.imta.name
  flavor_name     = "m1.small"
  key_pair        = data.openstack_compute_keypair_v2.os_kp.name
  security_groups = [ "sg-open" ]
  network {
    name = "internal"
  }
  user_data = templatefile("${path.module}/install-mariadb.sh", {
    db_rootpassword = "root"
    db_name         = "wordpress"
    db_user         = "lab-tf"
    db_password     = "lab-tf"
  })
}
Apply the infrastructure. When Terraform returns, in the dashboard, go to Compute → Instance, clic on the wordpress-app and look the Journal.
By refreshing, you may see the cloud-init execution.
When cloud-init is done, you should be able to access the application in the browser using the floating IP, with wp path, e.g. http://10.129.178.116/wp. Note the http protocol and not https.
4.1. Local Variables
In our vm.tf, we can see that some values are repeated across multiple resources.
We can factor them out with locals blocks that defines module-local variables.
Within a module, multiple locals block can be defined.
Typically, in a module composed of multiple files, there will be one locals block defining the variables used in each file.
But in the end, the local object contains the union of all variables, so a variable defined in one file can be accessed from another file as long as both files belong to the same module.
At the top of vm.tf, copy the following.
locals {
  vm_flavor = "m1.small"
  db_user      = "lab-tf"
  db_password  = "lab-tf"
}
And at the top of internal_net.tf, the following.
locals {
  network_name = "internal"
  sec_group    = "sg-open"
}
Replace all instances of the values in both files with the corresponding references.
Plan and Apply. Your infrastructure should not have changed.
No changes. Your infrastructure matches the configuration.
4.2. Input Variables
As you know, login credentials should NOT appear in plain text in the configuration.
Terraform allows a module to get input variables with the variable block.
At the top of vm.tf copy the following. It declares the two credential variables with their type and a description but not their values.
variable "db_user" {
  type        = string
  description = "OpenStack wordpress DB username"
}

variable "db_password" {
  type        = string
  description = "OpenStack wordpress DB password"
}
Remove the corresponding variables from the locals and replace their references with the prefix var instead of local.
Run terraform plan. Terraform will prompt you for the value of the input variables.
Indeed, all input variables must be instantiated to produce a plan.
Enter the previously hard-coded values: lab-tf and lab-tf. There should be no changes in your infrastructure.
We do not want to provide all variables manually each time.
There are multiple ways to provide values for input variables.
The most common is to put them in a .tfvars file.
Create wp_creds.auto.tfvars and copy the following.
db_user = "lab-tf"
db_password = "lab-tf"
Plan and Apply. Again, the infrastructure should not change.
Here we have moved our values in another file. The naming of this file is relevant.
The .auto.tfvars suffix allows the Terraform CLI to use this file automatically on plan and apply.
The same automatic input can be achieved with the filename terraform.tfvars or environment variables prefixes by TF_VAR_.
You can learn more on this topic at https://developer.hashicorp.com/terraform/language/values/variables#assigning-values-to-root-module-variables
5. Clean up + surprise
We are done, clean up with
terraform destroy
Imagine we want to spin up again the two VMs together with the network resources we created.
Plan and Apply.
You may get an error that resemble the following.
│ Error: Error creating OpenStack server: Bad request with: [POST https://openstack.imt-atlantique.fr:13774/v2.1/servers], error message: {"badRequest": {"code": 400, "message": "Network a8b9b2f3-eb33-4cf4-9e3e-80af8a910af8 requires a subnet in order to boot instances on."}}
│
│   with openstack_compute_instance_v2.wp_db,
│   on vm.tf line 41, in resource "openstack_compute_instance_v2" "wp_db":
│   41: resource "openstack_compute_instance_v2" "wp_db" {
│
The important parts here is the message: "Network a8b9b… requires a subnet in order to boot instances on." and on which resource it failed: openstack_compute_instance_v2.wp_db.
The reason is that the VM depends on the network resource but there are no explicit dependency link, So Terraform created both in parallel. To explicitly add a dependency, we can use the depends_on meta-argument.
In both VM resources, add
depends_on = [ openstack_networking_network_v2.internal ]
to add explicit dependencies from VMs to network resources.
Before trying again, make sure you start from a clean infrastructure with terraform destroy. Apply again and pay attention on the order of resource creations.
We are finally done.
terraform destroy
Verify on the Dashboard. See that the key-pair was not deleted. Can you remember why ?
Do not delete the key-pair for now, you will need it later.